


Introduction
Delta Force S10 Season's brand-new map AZ3 Nuclear Power Plant is now live. As a high-risk, high-reward map centered around a radiation mechanic, spawn point distribution directly determines the life-and-death rhythm of each match. The map is centered around the central RBMK reactor and sarcophagus, divided into three major sectors: West Zone, Core Zone, and East Zone, featuring a multi-level interconnected above-ground and underground structure.
Whether you're a zero-to-hero player looking to avoid combat and extract safely, or a fully-kitted assault team wanting to push the core for top-tier red loot, understanding spawn point patterns is the first step. This guide is based on extensive combat verification, providing a complete breakdown of all 14 fixed spawn locations' refresh mechanics, mutual exclusion rules, and practical response strategies to help you make optimal decisions from the start.
1. Global Refresh Mechanics Overview
The Nuclear Power Plant map features a total of 14 fixed spawn points, with 7 on the west side and 7 on the east side, symmetrically distributed along the central reactor/sarcophagus axis. Each match spawns a fixed 8 teams, with 4 on each side.
The overall configuration can be summarized as:
i. Total spawn points: 14 (West 7 + East 7)
ii. Teams per match: 8 (West 4 + East 4)
iii. Per-side refresh logic: 1 guaranteed team + 3 teams randomly from 5 points = 4 teams total
iv. The map only offers Normal and Confidential difficulties, with no Top Secret mode. Standard match duration is 30 minutes.
Spawn points on the Nuclear Power Plant are not uniformly random — there is a strict mutual exclusion refresh mechanic. Understanding the exclusion rules lets you predict where enemies won't be and where death traps lie — this is the most critical tactical knowledge for the Nuclear Power Plant map.
2. Mutual Exclusion Refresh Rules Explained (Core Key)
Mutual exclusion refresh is the soul of the AZ3 Nuclear Power Plant spawn point system. Understanding it dramatically improves your opening judgment accuracy.
1. Core Zone Exclusion Rules
i. The 4 Core Zone #1 positions around the sarcophagus and RBMK reactor are guaranteed spawns every match, making them the most combat-intensive areas on the entire map.
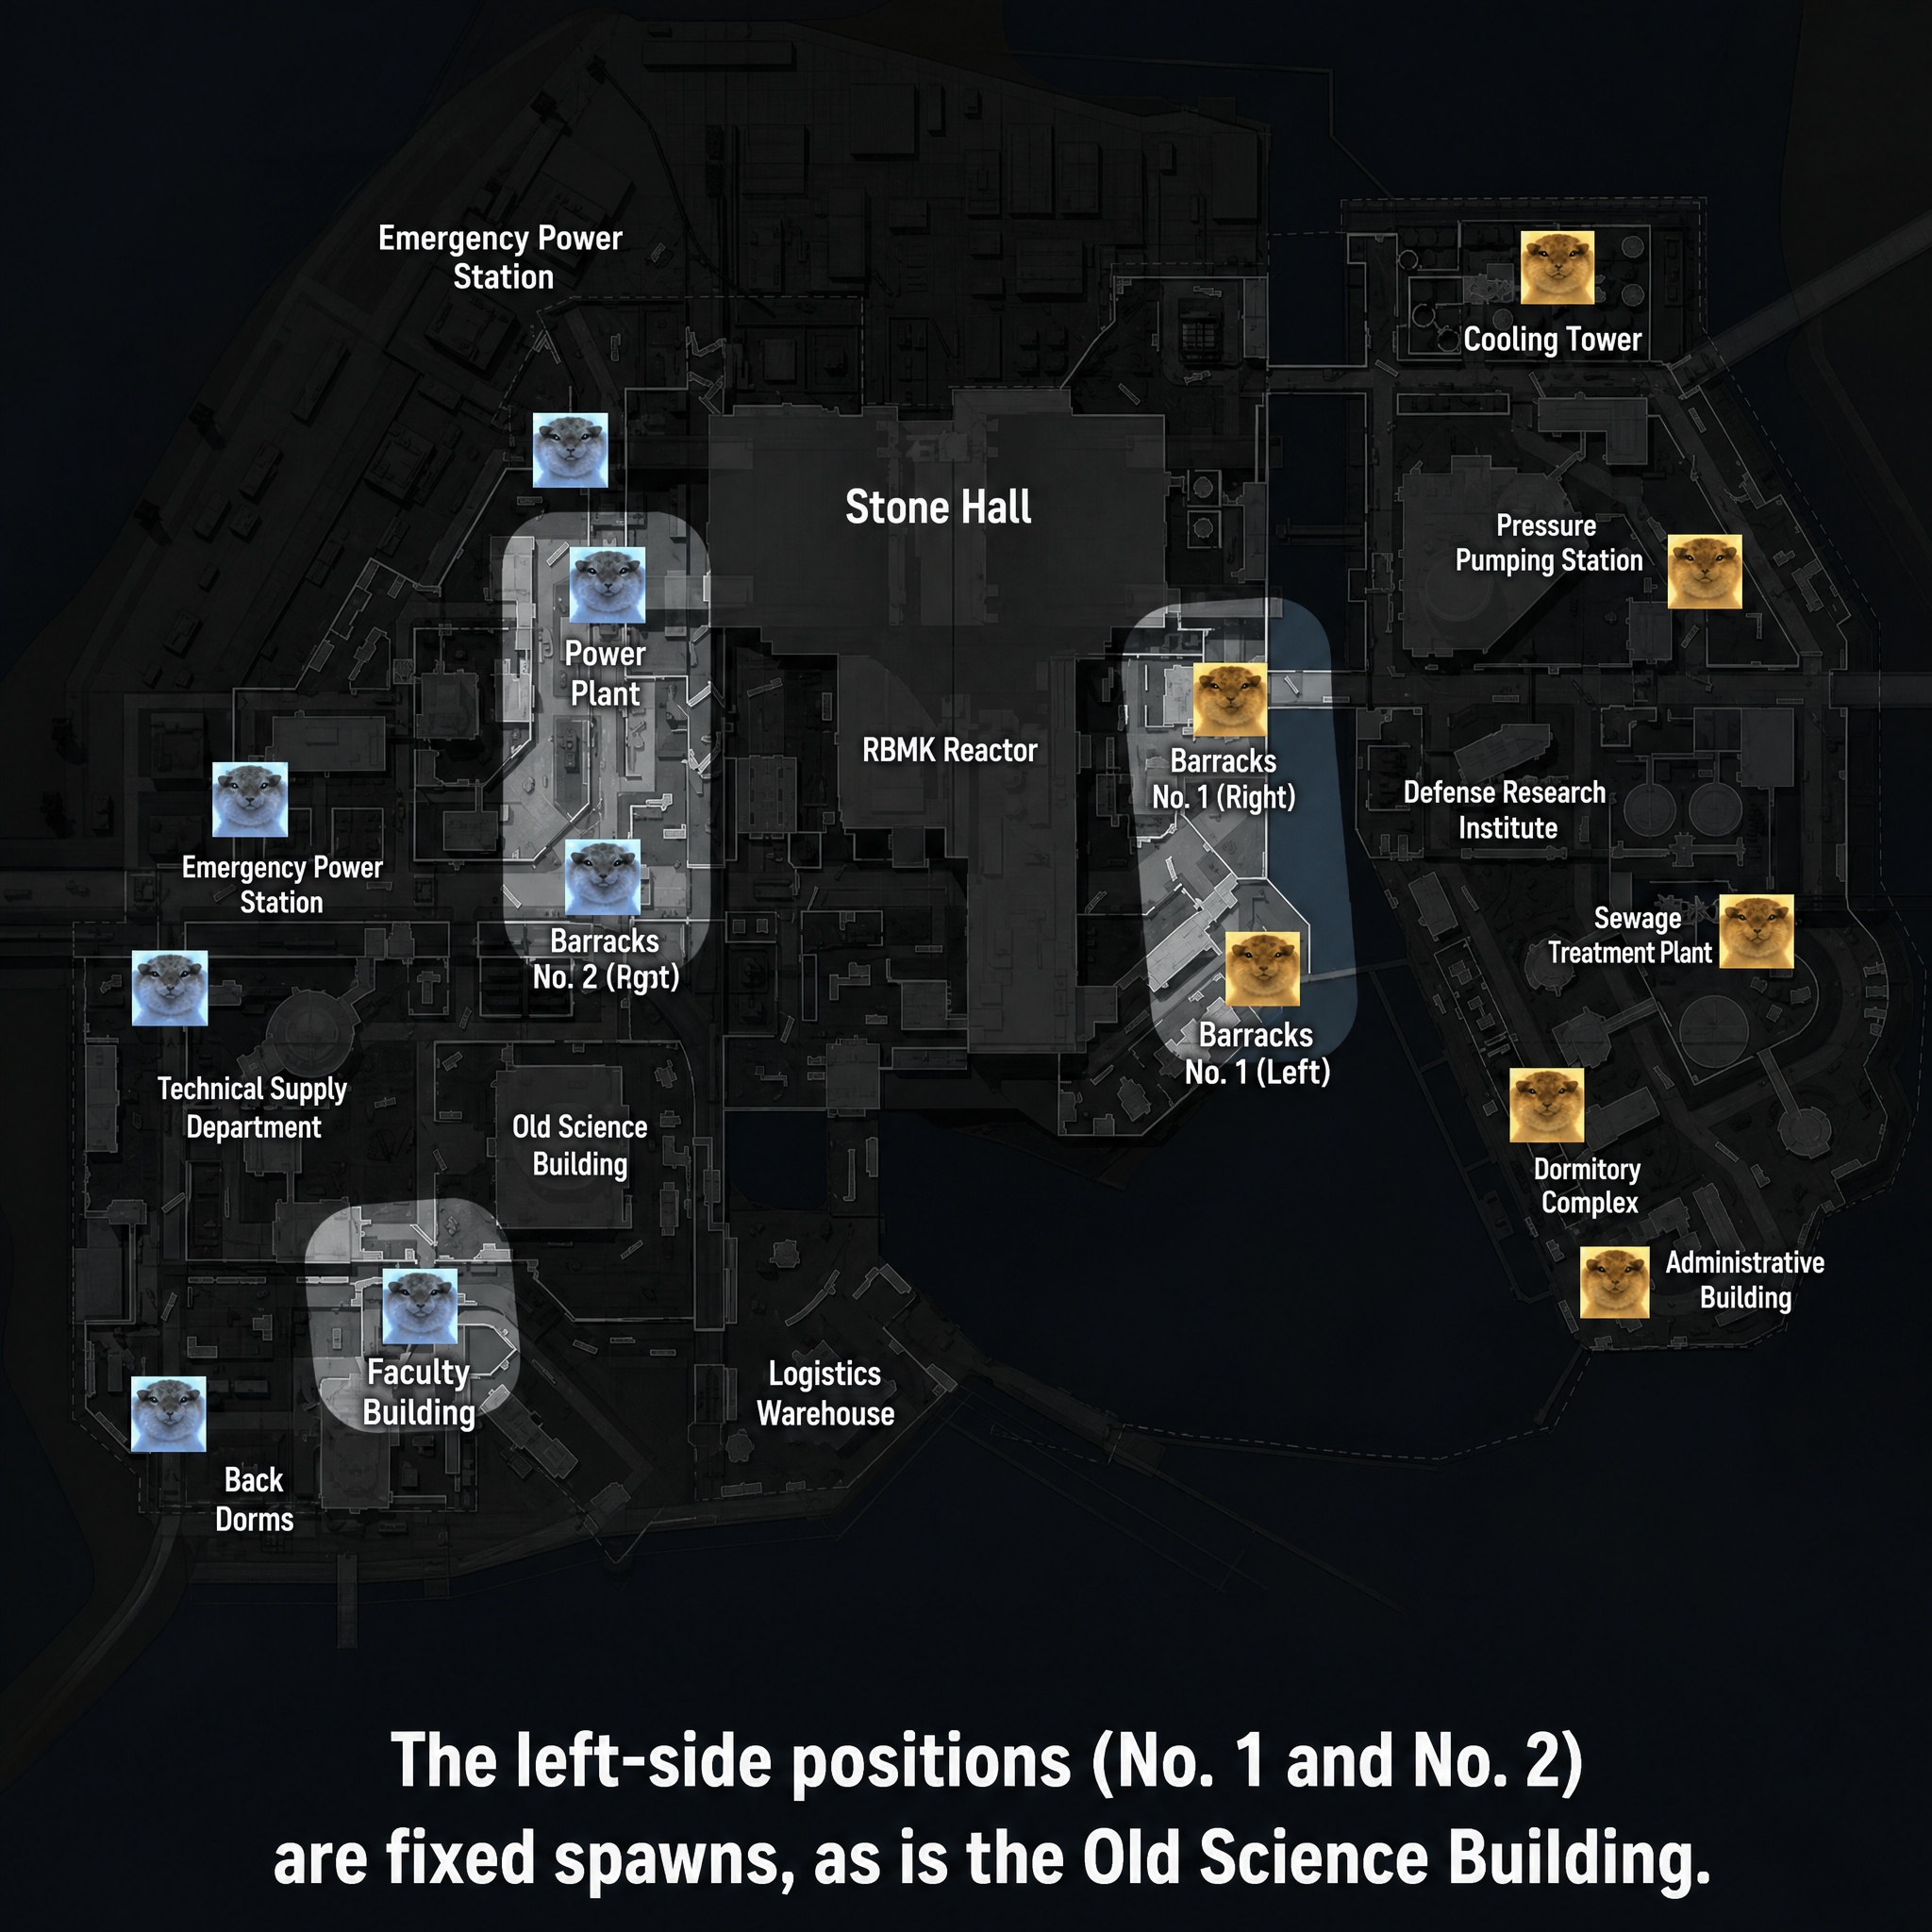
ii. The upper and lower point groups on the same side of the Core Zone are mutually exclusive. If the upper position spawns players, the lower position will have absolutely no one this match, and vice versa.
2. East-West #1 Position Exclusion Rules
i. The West #1 and East #1 positions are mutually exclusive — only one of the two will spawn a team per match, similar to the Zero Dam east/west building #1 position mechanic.
3. Edge Pair Exclusion
i. Some edge positions have paired exclusion relationships — if one team spawns at a position, its paired position will have no respawns this match. For example, Core Reactor #2 is exclusive with Emergency Train Station #2; Turbine Hall #2 is exclusive with Seaside Office Building #2.
4. Remaining Random Refresh
i. After removing guaranteed spawns and exclusive pairs, 3 teams are randomly generated from the remaining 5 positions per side, forming the 4-team total per side. This means spawn distribution varies each match, but always follows the above rule framework.
Practical advice: If you spawn in the Core Zone (e.g., RBMK Reactor #1), rush to stairs or cover immediately — never expose yourself in the open hall. If you're a zero-to-hero player and see the Core Zone spawn occupied, turn around and go the other way — don't join the chaos.
3. West Side 7 Spawn Points Detailed Analysis
The 7 West Zone spawn points cover core-proximity points, popular loot points, and edge exile points, adapting to all playstyles from aggressive pushes to zero-to-hero runs.
i. Core Reactor #1 (Core Aggressive Point)
The spawn point closest to the central reactor main building. Fastest route to rush the radiation zone for benchmarks and large safes. High probability of encountering East #1 players for gunfights immediately on landing. Extremely high combat risk — suited for fully-kitted aggressive playstyles.
ii. Core Reactor #2
Also a core-proximity point, positioned on the rear side of the reactor. Can take stairs to flank enemies inside the main building. Mutually exclusive with Emergency Train Station #2 — if Reactor #2 has players this match, Train Station #2 will have none.
iii. Emergency Train Station #1
Mid-tier transition point. Can choose to push forward into the Core Zone, or fall back to loot the Spent Fuel Plant materials. Flexible pace, moderate combat intensity. The Emergency Thermal Power Plant always spawns weapon cases and keys, making firefights very likely.
iv. Emergency Train Station #2
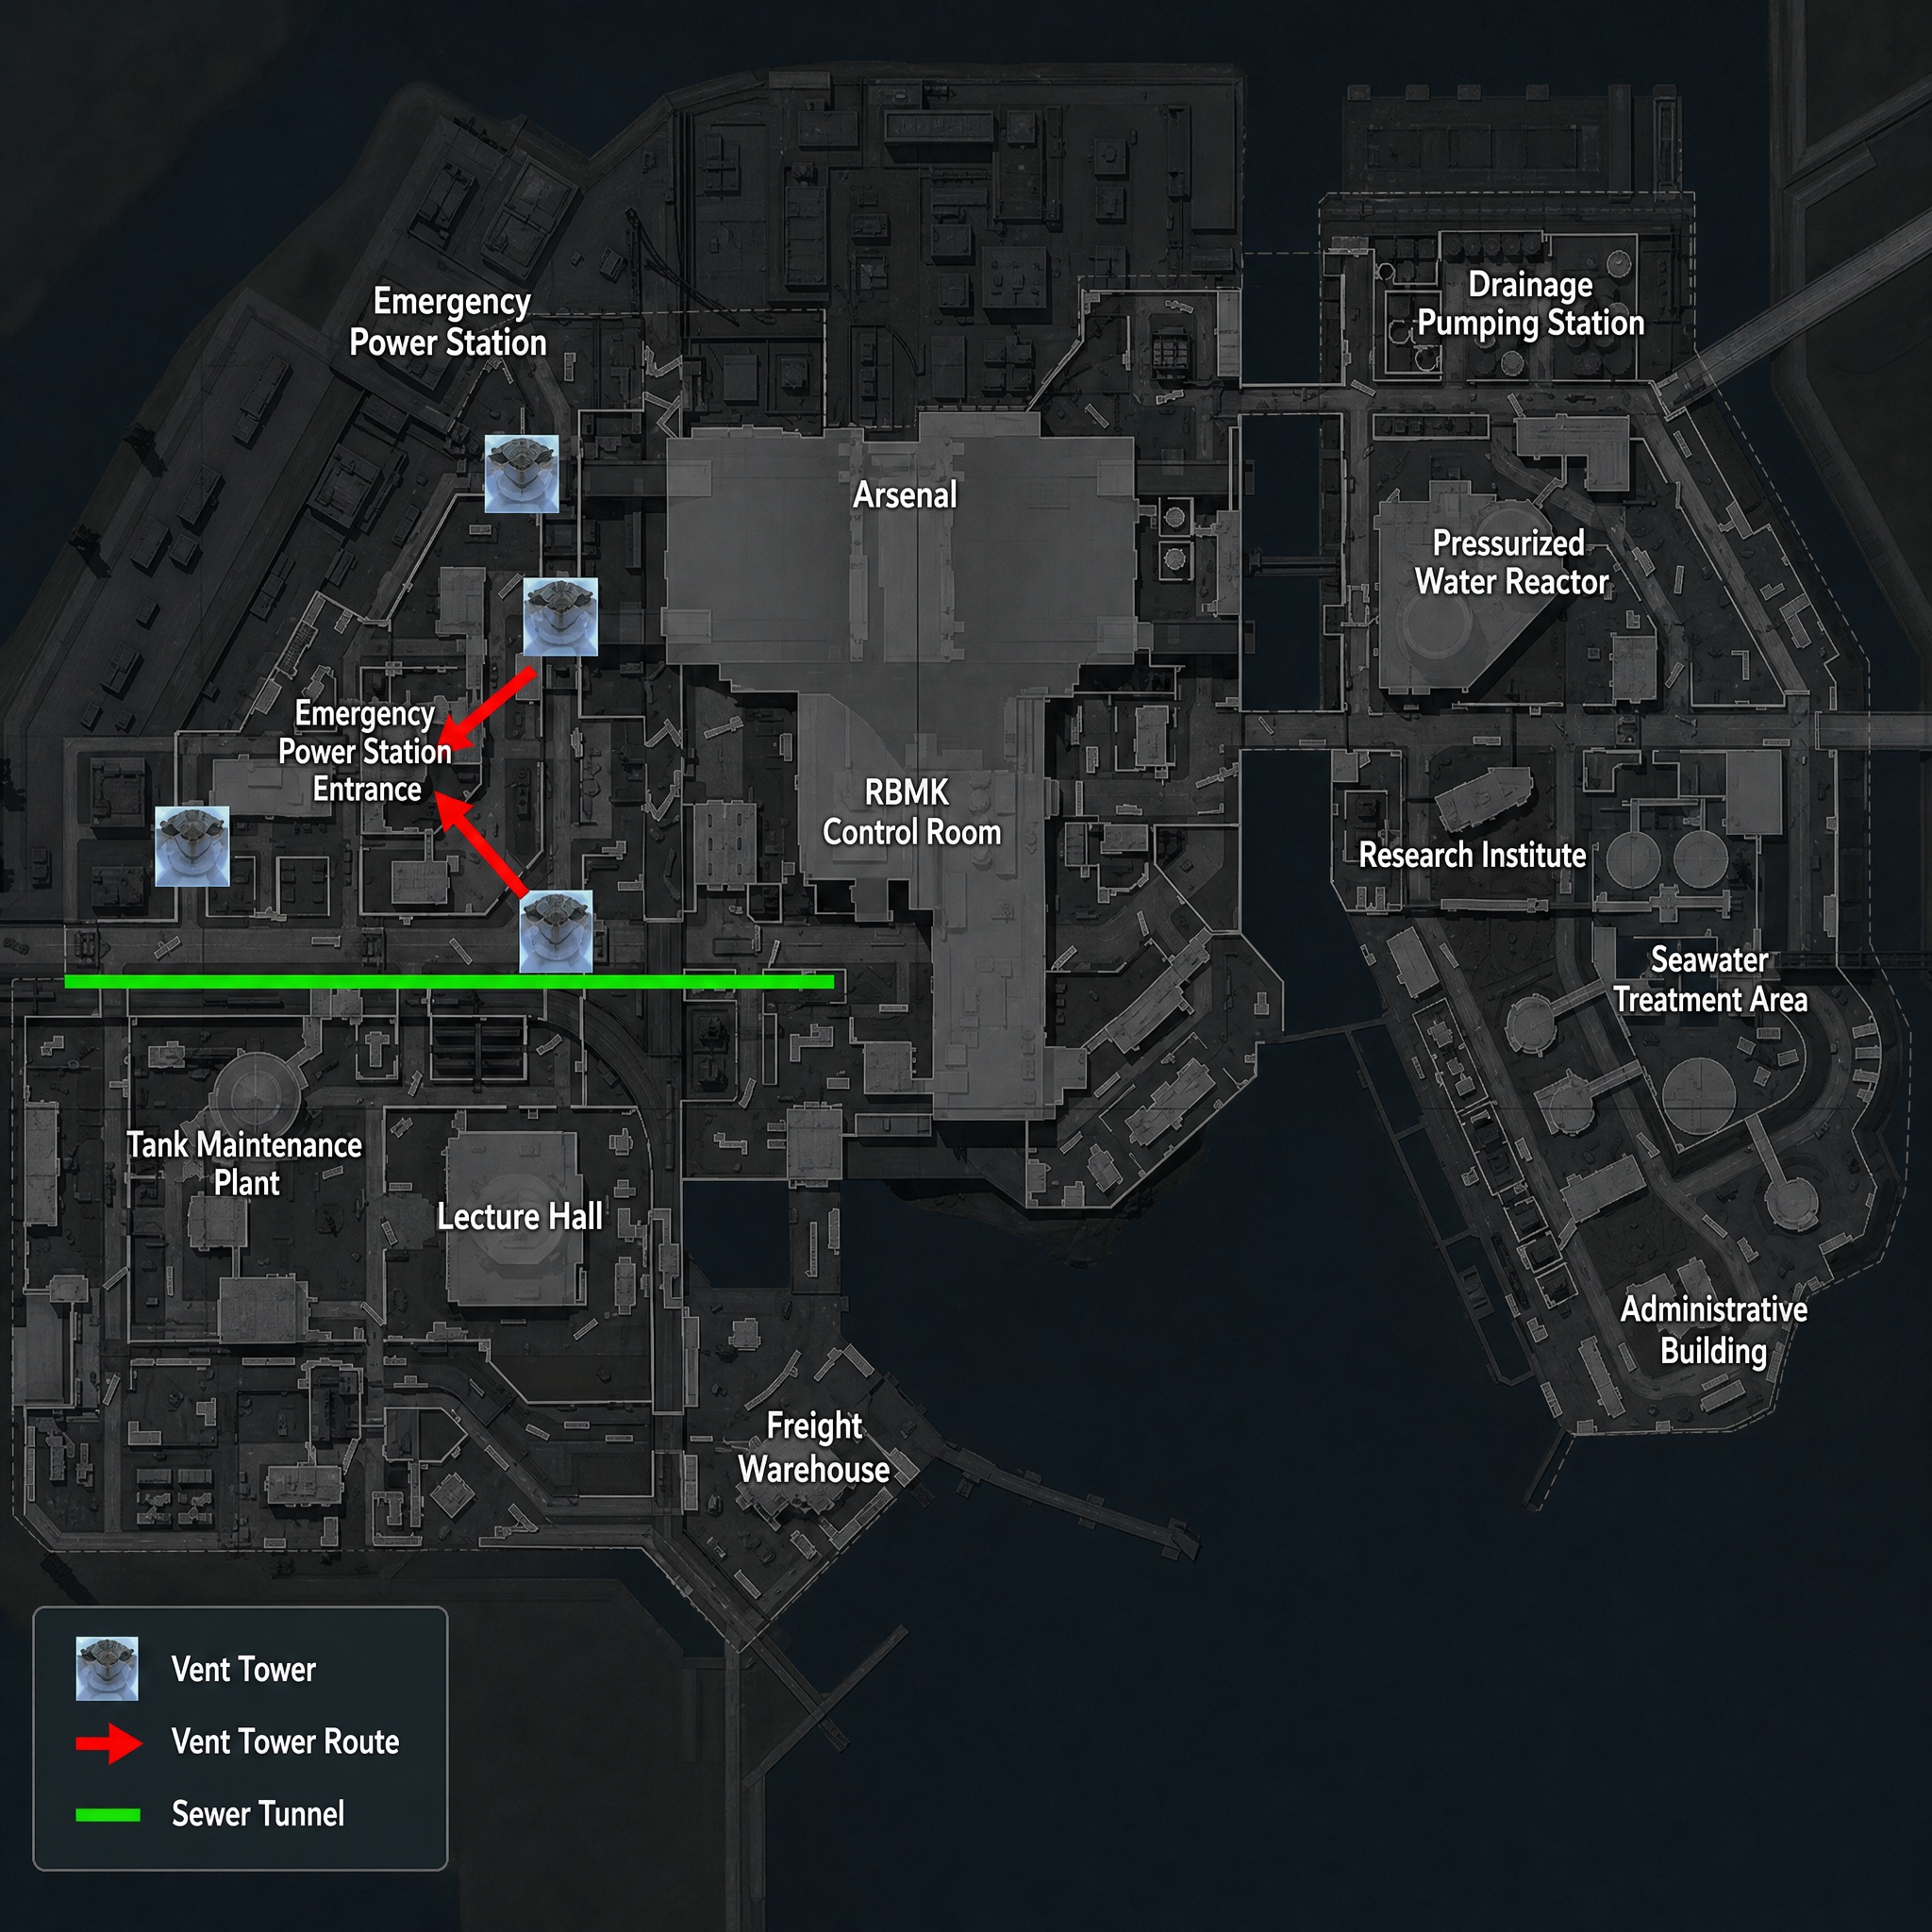
Located on the outer northwest side. Slow to reach the core, primarily focused on looting outer factory buildings for transition. Mutually exclusive with Reactor #2. Note: the fire station area has had players spawn both above and below, and combat always breaks out at the start because upper spawns cannot directly enter the core — they must go down to access it.
v. Spent Fuel Processing Plant
Land and loot nearby factory materials, close to the post-processing keycard room, suitable for steady development. Low early combat frequency. The red main building has a fixed card-swipe point on the tea table to the right after entering — a cold spot nobody contests.
vi. Post-Processing Plant #1 (West Zone's Best Loot Point)
Directly pick up two key room cards at the start, with dense factory loot. There's a breachable gap in the wall toward the Core Zone — no access card needed to infiltrate the core interior, offering maximum value. The Post-Processing Plant server room card is worth approximately 1.59 million Havoc Coins, with relatively moderate competition.
vii. Post-Processing Plant #2 (Edge Exile Point)
The farthest west corner of the map. Scarce loot on landing, can only develop by heading to the Transport Warehouse. The advantage is fewer players and less combat — an optimal drop for zero-to-hero players.
4. East Side 7 Spawn Points Detailed Analysis
The 7 East Zone spawn points are symmetrically distributed with the west side, but each has its own unique loot distribution and combat rhythm.
i. Turbine Hall #1 (East Core Aggressive Point)
Counterpart to the West Reactor #1. Rush directly into the Turbine Hall main building at the start, securing the second-floor angle position — the most intensely contested point at the start. The Turbine Control Room card is worth 1.70 million Havoc Coins, a must-contest point in the Core Zone.
ii. Turbine Hall #2
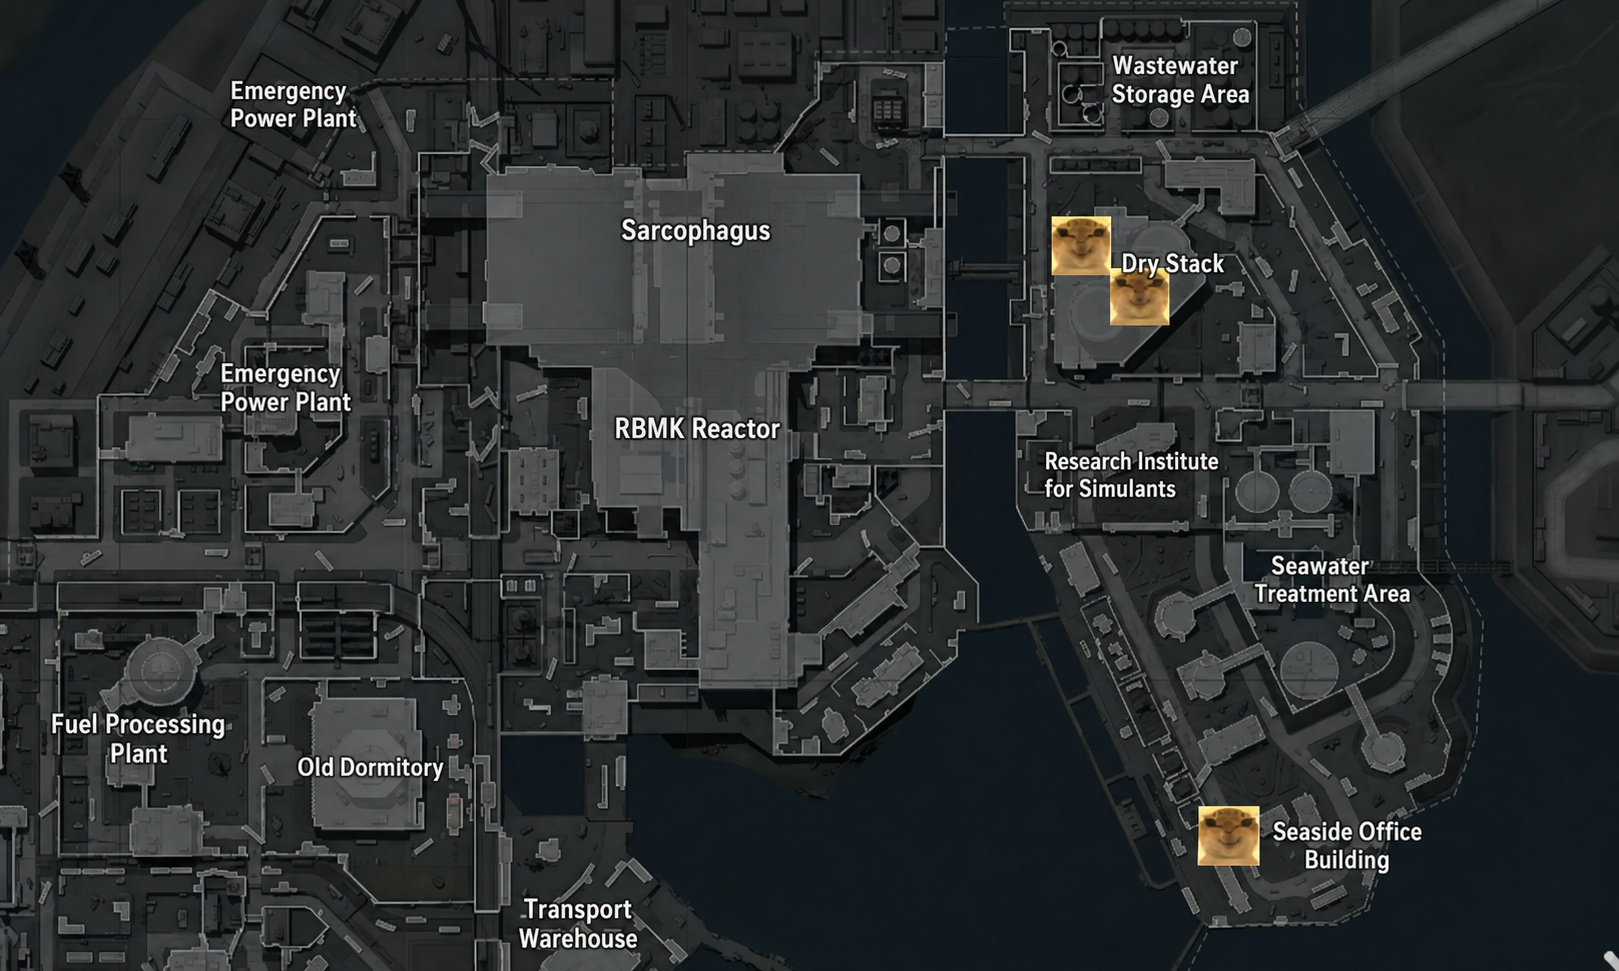
Rear position of the Turbine Hall, flanking through the side door to ambush enemies inside. Mutually exclusive with Seaside Office Building #2.
iii. Pressurized Water Reactor #1 (East Zone's Top Loot Point)
Fastest access to the Pressurized Water Reactor building and Stellarator Research Institute — two major high-value areas. The building has built-in card-swipe rooms and safes, offering extremely high development ceiling. The PWR Server Room card is worth 1.37 million Havoc Coins, with stable loot and safe routes. First floor entry through the red door — the card-swipe point is on the counter straight ahead, visible immediately upon entry.
iv. Stellarator Research Institute
Enter the building, turn left and go up to the second floor. Fixed card-swipe point on the small tea table in front of the tool cabinet (corner room, low traffic). The Stellarator Control Room card is worth 1.20 million Havoc Coins. The basement middle level has an exclusive red loot "Enriched Uranium Sample" spawn point.
v. Wastewater Storage Area
Northeast transition point. Can push south toward the Pressurized Water Reactor, or go north to circle the outer perimeter for combat-free looting. High tactical flexibility. The large factory building in the upper right has an open-air red loot spawn point.
vi. Seawater Treatment Area
Southeast mid-tier point, near the coastal area. Can push inward toward the urban district, or head straight to the east-side discard-and-extract point to plan an early escape route. The basement has an exclusive red loot "Portable Isotope Identifier" spawn point.
vii. Seaside Office Building #2 (East Exile Point)
The farthest southeast corner of the map, away from the core combat zone. Suitable for solo zero-to-hero runs, slowly looting coastal materials. Mutually exclusive with Turbine Hall #2. Note: the coastline has no cover, making it easy to be sniped from across the shore.
Conclusion
Mastering the AZ3 Nuclear Power Plant's spawn point patterns is the first step toward high win rates. The 14 fixed spawn locations, mutual exclusion refresh mechanics, and 4-team east/west allocation rules let you predict enemy distribution from the opening and choose the optimal route. Whether playing a steady zero-to-hero run or a fully-kitted assault, understanding map mechanics is always a more critical competitive advantage than aim.